


Excessive electricity fence, low strain constructing
There's no better feeling at some point of fence creation than watching your excessive-energy metallic wires reach anxiety and create ideal immediately lines to complement the waft of the land they may be framing. The cautiously constructed fence is each pleasing and powerful. With a practical charge tag, excessive-power wire is an incredible cloth desire. This weblog will assist you nicely deploy, cease and tighten excessive energy metallic wire.
In preceding posts, we included the whole thing from planning the format of the fence to building H braces. As soon as those previous stages are complete, wiring may be mounted in a configuration suitable for the fenced environment. Decide how many wires might be set up and what number of will need to be energized. Remember, any fence over six strands or over 54 inches high have to be supported with a double H at the nook, end or gate. Putting wires on the proper peak for farm animals or predators will make a very powerful fence. When wires are strategically positioned at heights to in shape the way in which the expected animals are possibly to have interaction with them, there is a natural recognize for fences after a quick and surprising learning curve.
Cheating is commonly frowned upon, but there's an exception in fencing! You could mark a cheat stick at each twine top with out getting rid of the tape measure from every submit. Some thing can be used as a cheat stick, e.G. 1 "x1", fiberglass stick, a stick, a further dropper, and so forth. You could pick out to go offline and tag each post once, or convey a cheat stick with you. Both manner, your posts could be tagged fast and correctly.
To begin wiring, load the coil onto the rotating Jenny. A Jenny maintains your coils neat and orderly as the wires are paid for alongside the production line. You can area Jenny at the give up post and stroll alongside the line, or location Jenny inside the lower back of a truck or side through facet (depending on Jenny's fashion), tie to the quit put up, and then force slowly along the road as Jenny can pay for the twine behind you. To keep steps, be counted the columns and braces as you proceed. Every other alternative whilst on foot pay wires is to region a stressed out Jenny at every give up to take away wasted travel and permit two-way pay wires.
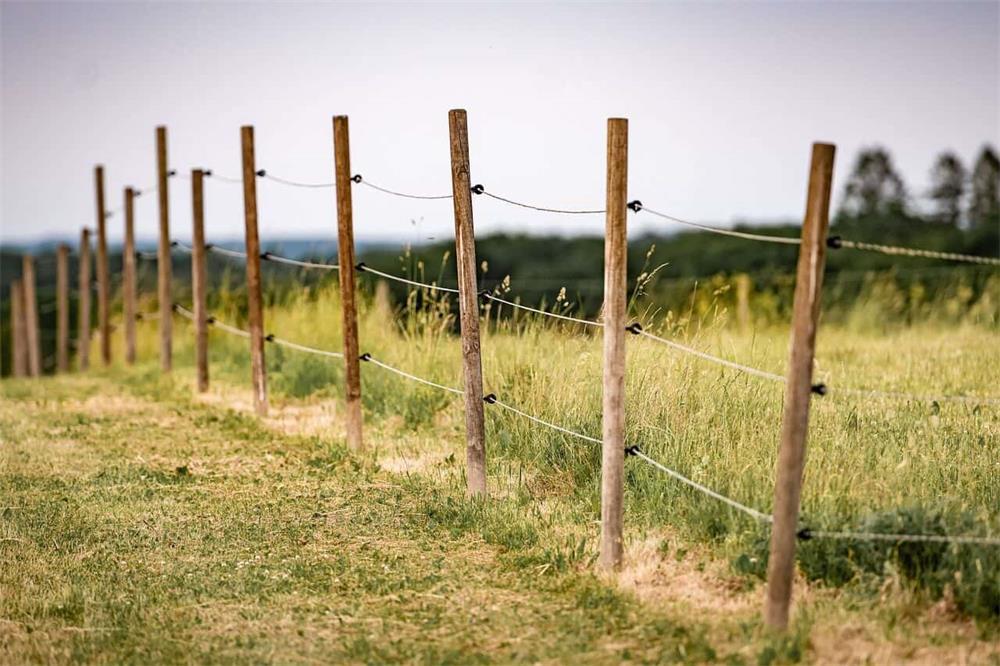
Pay wire transfers till you attain the next quit publish. Make certain to feed efficiently at corners or bends and do not pass through the middle of h-bracket or diagonal bracket strains.
Diagram showing traverse paths round bends/corners
Diagram showing traverse paths around bends/corners
At this factor, the order of operations is critical. If the alternative quit of the twine has terminated on the some distance submit, the crimping sleeve, wraparound insulator and tubular insulator can be slid onto the wire. If the opposite stop of the wire remains on the rotating Jenny or has now not terminated, the insulators and fittings may also slide on from that stop. Loading insulators from either cease is acceptable and can vary relying for your choice or the ease of reducing travel up and down the fence line at a given stage. An important part of this technique is understanding how many line put up or "tube" insulators are required based totally on:
Your submit count (which includes vertical posts that make up the H-bracket, diagonal H-bracket lines, and one or more in case of rely mistakes)
How many wraparound insulators are required (do not forget quit posts and any bends or corners in the center of operation)
Insert crimping sleeves in the best order concerning insulators. Region the crimping sleeve on the cord earlier than winding.
Vicinity the crimping sleeve at the cord before winding.
Wire submit insulators, sometimes known as "tube" insulators, are commonly 4 inches long and slide onto wires and bind to each put up. They insulate the wires from posts and staples. Some tubular insulators have flat backs that could rest towards a publish, others are spherical. Most models of tubular insulators have fins which are clamped whilst staples are driven over them -- forming a grip handle to keep the insulator in area. If you are quick of tubular insulators or need to replace one after the fence is finished and tightened, spiral insulators offer the correct answer. They may be set up afterwards through a quick flip of the wrist. Surround insulators are available in distinctive lengths -- 20 "(I40), 24" (I40-24) or 30" (I40-30). These insulators have aluminum inserts that save you tensioned wires from passing through the plastic. Use wraparound insulators to save you stay wires from contacting the terminal posts at bends, corners, or ends. Larger columns on the end will require large wraps, along with 24 inches or greater, depending at the column size.
That is a brief instance of an "L" shaped fence collection with a total of 20 line posts (10 line posts on every facet) and a ninety° perspective in the center (supported by way of H brackets on every facet of the nook posts). The hypothetical fence terminates at the alternative end and consists of wires (non-wires do now not require insulation).
Pay for wires on the same time as calculating what number of locations insulators or crimping bushings are needed, such as diagonal helps, auxiliary vertical helps at H-helps, line posts, 90° bends at nook posts (add two tubular insulators for secondary vertical supports with crimping and a 20 "ring count secured in location) and stop posts. This configuration translates to a list of the following substances from one quit of the fence to the alternative:
Initial wraparound insulators with crimped connections (24 "insulators for full wraparound 6-7" columns).
A tubular insulator used to help a diagonal line with a crimped side on every facet
Three tubular insulators (one vertical H help, 10 line posts and a 2d vertical H guide at the nook).
Wraparound insulators at ninety° angles (20 "or 24" relying on column length).
Tubular insulators used to aid diagonal strains, with a crimped area on each side,
3 tubular insulators (one vertical H guide at the nook, 10 line posts and a 2nd vertical H aid at the alternative end).
The tubular insulators of the diagonal assist line are fixed in vicinity with a crimped edge on each side.
End with crimping and wraparound insulators at the stop column (20 "or 24" relying on column length).
First, on one cease put up, slide a long crimp sleeve onto the twine, accompanied by way of a wraparound insulator (24 "wraparound for 6-7" diameter posts).
Wrap a loop across the submit with a wraparound insulator, leaving enough wire ends for crimping. Compress the crimp and trim any excess tail. This leads to complete termination.
At the opposite end of the publish, cut the wire with enough tail to wrap around the publish, but do no longer curl it right now.
Slide the insulator onto the wire in the order we cited earlier.
The usage of the insulator and crimp in the right order, wrap the wire (now within the wraparound insulator) across the stop submit and slide the tail into the crimp sleeve, via which it's far pulled unfastened and properly compressed. Trim any excess tail.
Now which you have a terminal at each end, you could hold stitching wires/insulators on the descent and ascent and upload tension to the wires that work down from the top wires.
Before adding tension, it is beneficial to pin every wire on the preferred mark on the descending or ascending column to start the wire at the suitable top. In case you retain to fully tighten the cord without binding these terrain adjustments, you may discover your self struggling with the wire and unable to elevate or decrease it in your mark.
Tip: Staples are reduce in specific methods, in order that they must be set up hence. While holding the staple with one leg away from you, you'll note the perspective of the cut with one leg facing up. If it's miles the right leg, it's miles the "right cut" staple food. In this example, rather than driving the staple vertically, flip the staple clockwise (for the right-reduce staple) at a forty five° attitude. This can permit the peg legs to amplify inside the timber rather than crossing every other.
It's also recommended to pin the wraparound insulators loosely in corners or bends before adding anxiety. Whilst binding wraparound insulators, do no longer step over them. Rather, power the staples horizontally above and below the surround to prevent them from shifting up or down. Once the very last tension has been reached and you are happy with the completed product, those staples may be bent round.
If pulled at corners or bends, the strainer must commonly be located on the center of the fence or friction middle. Filters must no longer be hooked up next to tilting or rising columns. A unmarried top class filter can tighten 4,000 toes of linear fencing horizontally. Each alternate of direction, full-size drop, or massive upward push equates to an boom in the general distance of the fence by 500 feet every time it seems.
Example: Your fence has a fringe of three,000 toes, but is not a straight line. The format includes a massive dip (+500 toes) and three turns (+1500 toes). The theoretical distance would be more like five,000 toes, so a 2nd clear out would need to be mounted on every line.
As a generalization, plan a filter each 2,six hundred feet. This commonly covers all bases and is a conservative estimate of the filters required for fence production. Even though the fence line is much less than 2,600 toes, as a minimum one strainer in keeping with proportion is needed to correctly tensioner - a excessive energy metallic wire tightened only by using hand will no longer have the same overall performance as a metal wire with the mechanical advantage of a filter out.
Once you have observed in which to location the filter out, you may cut the wires and set up them one after the other, running from the pinnacle wire down. This may lift the twine as you stroll, therefore minimizing tangles and confusion of a couple of free wires within the mix. Filters may be established at once underneath every different (in a "stacked" vertical arrangement) or staggered (in a stepped arrangement). There is no difference between these techniques besides for visual choice. Enterprise standards propose putting in a anxiety spring on one strand to act as a anxiety gauge for different wires. The tension spring is set up on a standard open clear out and pressed to a wire at the alternative quit of the spring. A marker at the spring makes it easy to gain the desired tension. After a few turns of the clear out tools, the first mark will be visible, indicating a tension of a hundred and fifty pounds. The second one marker will imply 250 lb tension - most and ideal setting for excessive tension cord.
When considering which clear out to apply, there are styles of ratchet filters,
The same old open-cease clear out has a hollow within the belt via which the wire is pressed to itself
Short-end filters do now not require crimping due to the fact they have an inner fixation layout at the back of the strap that grabs the wire and does not loosen
Each styles get the task completed, but, to shop time and a few curling sleeves along the way, many installers opt to use quick filters. No matter how the clear out is constant to the wire, the weight is the equal in both patterns. When the filter is located at the spring clip on the pinnacle, cycle the gear till you can truely see the hole thru the equipment (you'll pay attention the clicking of the clip and spring as you cycle the gear). Then, pull the cease of the twine up thru the hole within the tools until you pull out the slack through hand. The excess slack is folded over the gear so that it remains in place and does not slip back via the hollow. Cut off excess wires, but go away a 6-inch tail sticking out of the equipment. Slide the 6 inch tail down through the hollow until ¼" to ½"
Maintain this function and apply tension to the wire along with your hand at the same time as using the filter handle for preliminary rotation on the tools. At this point, the cord could be constant while not having to be fixed in region. Add tension and staples in the order that suits your surroundings and terrain. You may then continue to increase the very last tension while measuring the wire with the assist of a tension spring. The helps and columns could be strained for the first 24 hours. Examine stress tiers for the duration of the day. An extra click or two on each filter out is sufficient to take away any em-relief that happens at some point of Settings.
As soon as the wires are taut and stapled, the fence is complete!

